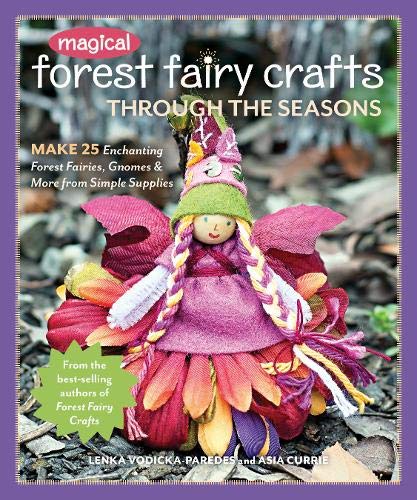
Create Enchanting Forest Fairies with Yarn Braided Hair
Related Products


Value:
points
-
Particulars
)

Create a charming collection of felt fairies, gnomes, and forest friends using materials you already have. With new projects endorsed by creative kids, the authors of "Forest Fairy Crafts" guide children in sewing and personalizing delightful fairy tale characters and toys. Elevate each season's joy by embellishing your creations with vibrant felt, threads, yarn, buttons, sequins, and more. These 25 crafts are appealing to boys, girls, and those young at heart. Let your imagination run wild with every stitch and braid to bring these whimsical creatures to life!
From the Writer
Looking for a quick way to style your fairy's hair? Try the Fancy Free method! This technique is perfect for fairies who prefer flying around over dealing with long hair. Say goodbye to fussing with braids or glue – this step-by-step approach uses yarn to create a magical fairy hairstyle effortlessly.


Step 1 – Wrap the Yarn
Wrap the yarn around your fingers around six times. To get longer hair, spread your fingers apart, or bring them closer together for shorter hair. Once done, clip the end of the yarn. This is a crucial step in creating fairy braids.
Step 2 – A Dab of Glue
Place a dab of glue on the highest of the fairy’s head. Pinch the wrapped yarn within the center; maintain that collectively and place it gently on the glue in your fairy’s head. You may organize the yarn so it lies flatter and every strand is touching the glue. Depart the yarn in loops so it doesn’t unravel.
Step 3 – Letting it Dry
When you’re pleased with how the yarn seems to be, let the glue dry. Now your fairy is prepared for a hat!
Fancy Braids – Our braids use multicolored cotton yarn for a enjoyable impact. You may as well combine yarns to create dramatic braids.


Step 1
Run a bit of yarn from the fairy’s foot, over the top, and again to the opposite foot. Lower it off. Measure 5 extra items the identical size so you have got 6 in all.
Step 2
Add a dab of glue to the highest of the top. Place the 6 strands of yarn on the highest of the fairy’s head. Line up the yarn over the glue so the strands lie flat. Glue the fairy’s hat (web page 36) over her hair earlier than making the braids. Let all the glue dry utterly earlier than braiding the yarn.
Step 3
When all of the glue has dried, it’s time to braid. Every braid has 6 threads; divide them into 3 teams of two threads. Braid the yarn to make brief or longer braids. Ask an grownup to assist in order for you. Tie the braid with a bit of thread that you just double knot, and clip any uneven items of yarn on the finish of the braids. Have enjoyable pondering of many different artistic methods to fashion fairy hair!
User Reviews
There are no reviews yet.